Showing posts with label business. Show all posts

And If I'm Still...

 
Learning to be intentional with my time and my energy... a lesson that I thought I had mastered. Thought being the keyword.
 
It has been forever since I last posted, April 17, 2015 to be exact. I have a bajillion topics, pictures, unfinished projects laying around to prove that I have been thinking about writing.
 
I just haven't.
 
Why? I'll tell you why. And why it can be a little, actually a lot, uncomfortable.
 
My little business has been cruising along at a comfortable pace. But then uneasiness creeps in {especially thanks to social media}. It's the tale as old as time, you're minding your own business, feeling good about your life and then you pause to take a look around...
 
And there it is. The gobs of people shouting from the roof top about how wonderful their life is because they got that huge promotion/new house/new workspace/picked up by a huge brand/insert your own good news here...
 
And you're in the same space and you're suddenly feeling like your dreams, your desires, your talents are falling on deaf ears. That maybe this is as good as it's ever going to get for you...insert the feeling of defeat. The wondering if this is where you throw in the towel.
 
When I can remember, I have been listening to a fantastic series that the uber talented, Jeanne Oliver has on her creative classes page, Listening Finding the Quiet. {It's a free series, but you will need to set up a free account with her network to access it.}


The world can be so loud and we desperately need quiet. We need time to think, process, pray, worship, plan, dream, forgive, heal and find direction.  To just be still.   Do we give ourselves this time to be quiet and truly listen to the voice of the Lord?  Are you striving and trying to navigate life in your own strength? Are you tired?  Do you know that the Lord pursues you?  Do you know that he wants to carry your burdens? Do you know that he deeply longs to communicate with you and have a relationship with you?  Are you ready to find the quiet and listen to his voice?
 
The description above is exactly what you get. 20 amazing people talking about that moment in their life that they asked, "Is this where I am supposed to be? Am I doing what I should be doing?"
 
I asked myself one day if I would even know how to listen for an answer. I also thought what an amazing experience it would be to ask and get an answer as clear as some of these people were getting.
 
For several months I would half heartedly ask, especially when business would slow down and I would start my cycle of worrying and trying to fix everything. Business would pick up and I would think of how easy that was.
 
A few months later I felt like everything had stalled. Business seemed off. My fitness journey felt like it was going no where. And everyone online seemed to be thriving. Every post seemed to start with "Fantastic News!!" and "I'm so excited to announce..." and I'm just over here like blah.
 
After spending a week or two convincing myself it was just a slow period, everything is totally going to be okay, something big is coming and my usual pep talks, I was frustrated. Defeated. Thinking I had reached the end of this dream and I needed to put an exit plan in place, even though my husband was encouraging me to keep going. It had been a solid 3 weeks since an order had been placed. Even longer than that since I had felt truly inspired to sit down and create something that felt good.
 
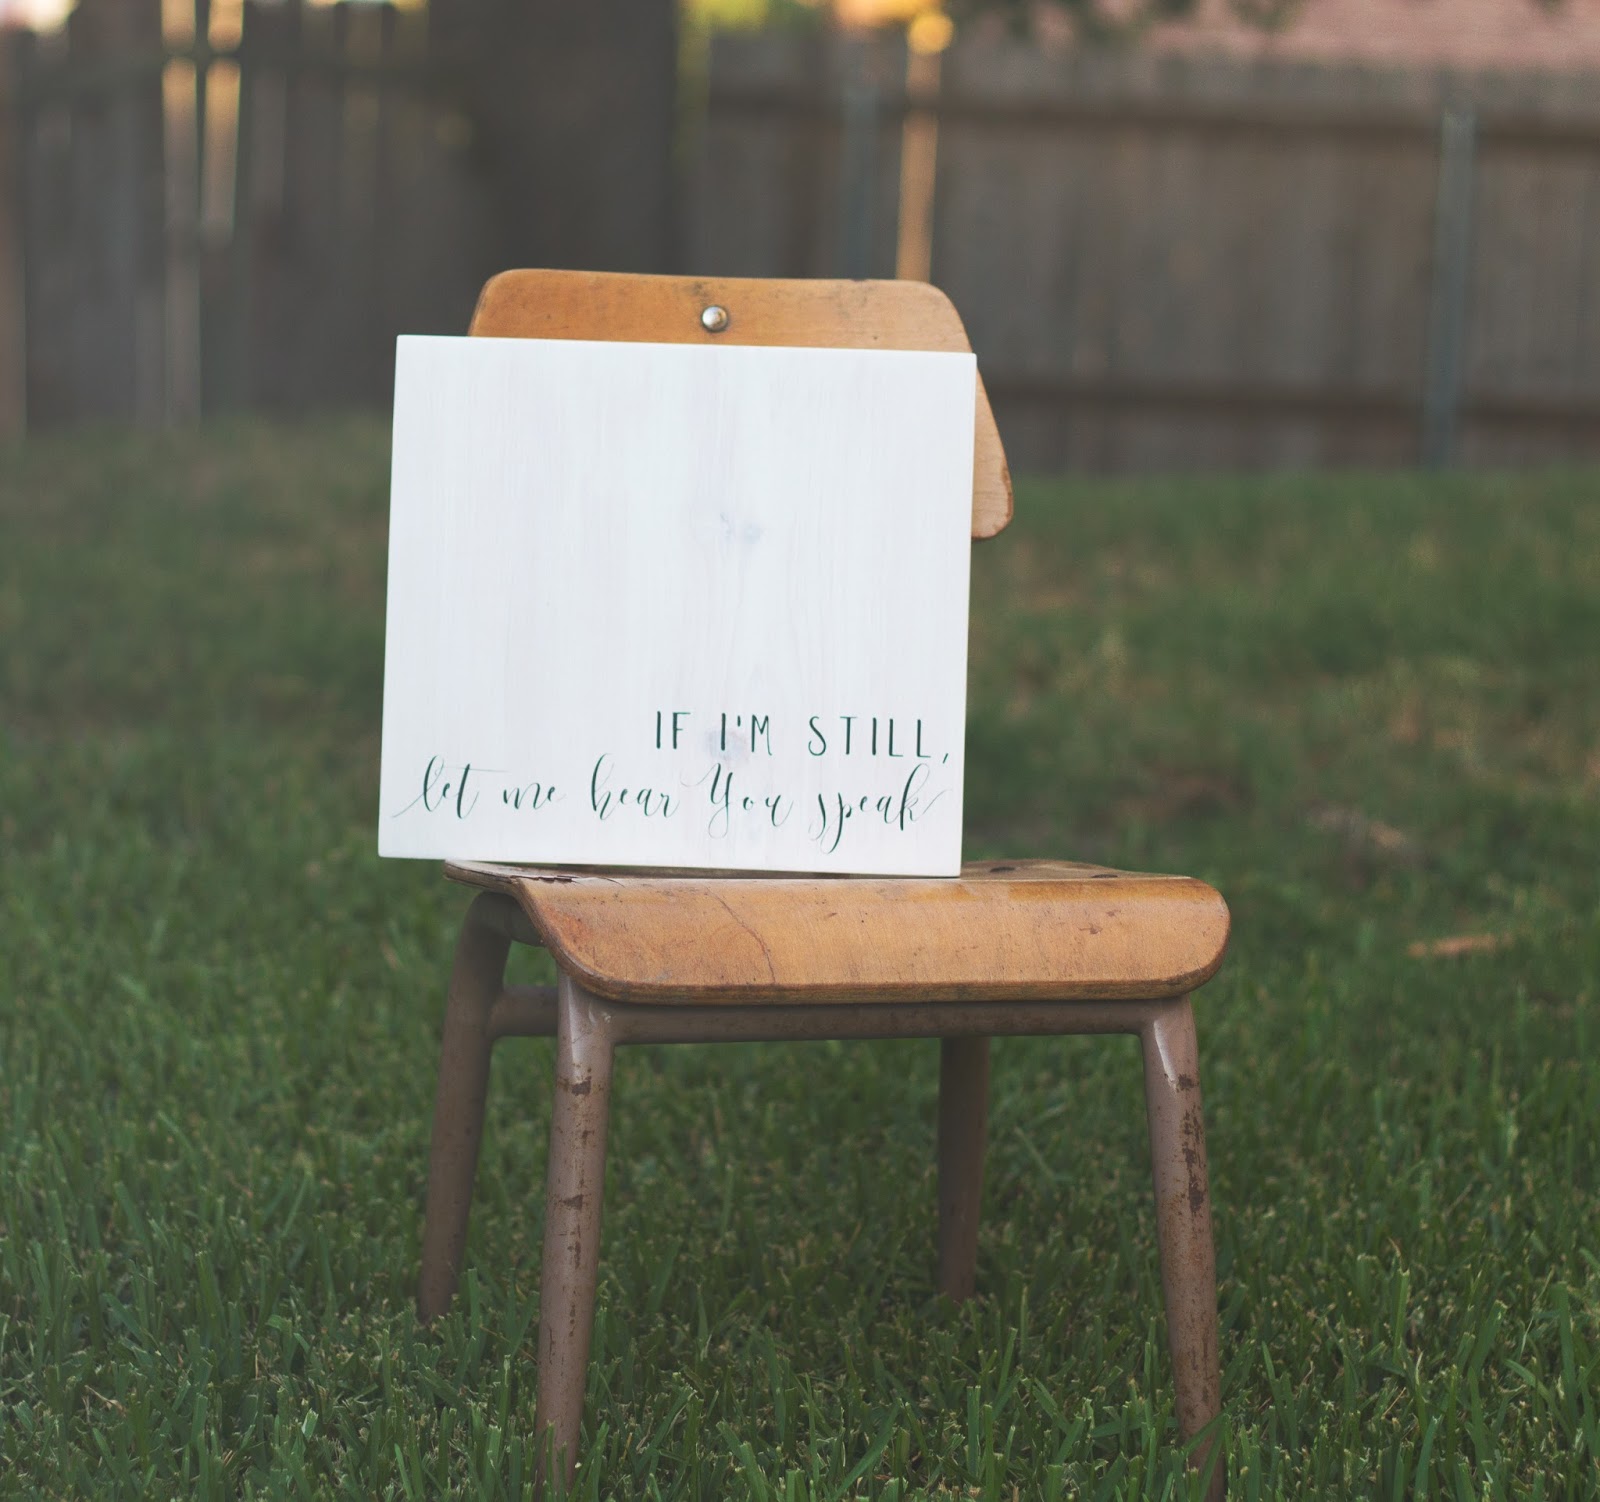
My husband was out of town for work and I sat one night as I was getting ready for bed and asked {very clumsily}, "What am I supposed to be doing? Have I given enough? Am I using my talents the way you have always intended me to? IS THIS WHERE I AM SUPPOSED TO BE?" There were tears and I kept playing this lyric over and over in my head.


The one thing I never expected the next day was peace. A peace that told me I was exactly where I was intended to be, just be patient and listen. Which can be the hardest part, because the answers don't always come fast, they come when needed and they are not always the clearest answers.

Like the pull of Facebook constantly showing an ad preview for your business page and the only part your eyes see is the "occasional blogger" part you just added to your profile.

The feeling to share your worries and frustrations on your personal Facebook page and that you truly know deep in your heart that better things are coming.

When your email is filled with previews of blog posts and podcasts of people sharing their stories of how they learned to stop and listen. And most importantly, trust the plan that has been written for their life by someone that is so much bigger than them. And encouraging others to share their stories with their followers.

Share. Share. Share.

Hint taken. And I knew exactly what words to share first.


I want to inspire. I want to make things that make people feel good. I want my girls, my family, anyone to look at my journey and know that I'm not using my talents, my God given talents, for fame and fortune. That my story is inspiring someone to listen and to take a chance with that wish that has been written on their heart.

I know this could have easily gone the other way. Instead of confirming that I need to continue on this path, He could have easily said no and pointed in a different direction. I think the peace that comes with asking with an open heart and then patiently listening would have made that an easy path to follow also.

Truth be told, this path is terrifying for me. I like to share the happy moments, the happy, sunshine unicorns and rainbow moments. I have always felt that sharing the insecure, doubtful moments equal me whining. But these are also the inspiring moments. The moments where if your story helps one person realize their dream or confirm that they are not alone with their feelings, you are on the right path.

And now my path is leading me to get these bajillion projects and ideas done. ;)


I Could Rule the World...

That was my statement to my husband the end of December..."If I could work as hard as I do during Christmas I'm pretty sure I could rule the world!"

Let me clarify, the handmade sign shop/blog/being the best crafter this world has ever seen world.

Ha! It's now the middle of February and I am no where near world domination {as you can tell since October is the last time I posted}. I'm not even close to dominating the craft market on my street.

Here's the thing, the highly successful shops you see on Etsy and the popular bloggers you love to read all have one thing in common. At some point they had to get their "stuff" together and figure out what works for them. Like a crafty a-ha moment, sometimes you have to change they way you work if you want to grow.

                                                                               source

I recently sat down and thought about what bothered me most. The fact that I have a 3-4 week turnaround time on Etsy orders really started to eat at me. I know I have missed out on sales because some people don't want to have to wait that long for a purchase. I know that I have given myself permission way too many times to spend a couple days doing nothing because I was getting orders shipped way before my turnaround time.

Knowing that I have pages of pending orders waiting on me would be like a gloomy cloud over my head some days. A gloomy cloud that would start sucking the creativity out of me and I want my creativity back.

I'm know working like every day is like the last day of my Christmas rush. Well, Monday-Friday, 8-5 {and sometimes in the evening}. Not just painting. I'm finding my passion in photography again. I'm working on drafts for upcoming blog posts. I'm slowly getting my creativity back for new items in my Etsy shop.

                                                                              source

And slowly working on dominating the craft world...on my street.

Glad & Sincere Hearts

I often have people ask if my home is filled with beautiful signs. Simple answer, no. Detailed answer, I have a few that are my favorites and I have plans for so many I would like to make for our home. But honestly, sometimes at the end of the day it's hard to sit down and make something for your home when you just spent the day making signs for other people's homes.

One of my favorite things to do while paint is drying is to waste hours browse Pinterest for some inspiration. A while back I found this pin from Hymns and Verses.


I wish I could find the actual blog post in her blog about it, the link takes me back to her blog in general, not the post. I do know it is a tea towel sold from Mary & Martha that she framed to display in her home.

Besides the beautiful hand lettering, I also love the message.

In our home, we always eat dinner together. It's nice at the end of the day to sit together and talk about our day. We may not eat the same thing, but we are sitting at the table together. And even if the kids don't like what's for dinner {which rarely happens} we always remind them to be thankful for the food we do have instead of wishing it was something else. Some days it's easy to forget just how blessed you are.

One of my bad habits is finding a quote that I love and then stressing on making a design for my Etsy shop. Once I finally have a design I like, I'm over having it in my house. When I was working on this design, my husband saw it and asked for it to be in our home, only on a bigger scale than what I had in mind.


We had a top from a console table sitting around that I thought would look great as a sign and fit my husband's request for a big sign {it measures 10" x 48"}. We have high ceilings in our living and dining rooms so this sign looks great hanging on our dining room wall above the doorway that leads to the kitchen.


We have history with this table. It was one of the first pieces of furniture we bought after getting married. At that time we had a very country theme going on and it was stained the color shown and hunter green. Soon the green was gone, replaced with black. And it had been repaired...several times.


A little someone also practiced her writing skills on this table top...


Since I don't have an endless supply of table tops sitting around I also made a smaller version on a 1x8.


Even though it's a smaller version, the message is still as powerful. This size is listed here in my Etsy shop.

So, what statement is speaking to you right now?

Sharing and Linking up here!!
http://www.chaosandlove.com/link-party-21/

All That Glitters...


Sooooo, I felt like I was getting on a roll with getting new blog posts up, but since (and during) the last time I put a new blog post up I was in the middle of getting my girls ready for school, my girls started school (=new schedule to get used to), I fell a little behind on orders and needed to catch up, I decided I wanted to devote more time to my retail space that I have not given it  and I got sick...BUT, the good news is I'm slowly working out a schedule that will let me post more often.

Anywho, let's get down to what you came for...glitter!!


I recently ordered some new German glass glitter from Meyer Imports and while paint was drying on orders, I have been having some fun with it. I have used it before on chipboard letters and turned them in to magnets. While digging through my craft hoard  stash I found an obscene amount of wood clothes pins and the glue and glitter started flying.


Working with the glass glitter is a really easy, fun and cheap way to add a little sparkle to ordinary things. Meyer Imports also sells a glue that works great, but I've also had really good luck with the Elmer's Glue All glue. Make sure it's not the school glue though, it's not strong enough to hold the heavy glitter on your item.
 
 
I'm a big fan of the glitter in a simple jar for decoration also. My girls and I made a quick trip to Hobby Lobby one day and I found some really cute small jars and tags that I thought would work for small wish jars. When the 11 year old excitedly agrees and asks for one for her room, you snap the supplies up.


I just used some small stamps I had on hand with some Tim Holtz metal tags and tied it on with some red and white baker's twine. How fun would these be as Christmas ornaments? I'm also debating about putting them in my Etsy shop, some sparkle to balance out all the wood.
 
In my downtime watching paint dry I also start looking at things I have lying around to reuse for something fun. I had a thick cardboard tube that had potential. I took it out to my saw, cut off a chunk of it and craftiness ensued.


I cut random pieces out to make it in to a quirky little crown.


That this quirky girl decided to try on...


Tales From a Paper Hoarder

I, my friends, am a paper hoarder. I have known this for a while and have come to accept it. And if pretty paper makes your heart go pitter patter and anxious that if you don't buy it right then and there, the giant stack will be sold out tomorrow...welcome friend. There is nothing but love and acceptance here {and maybe some paper envy!}.

For those of you that can walk down the scrapbooking aisle without noticing which paper is new, here is what it looks like.

This...this is my 2nd {!!} trash stack of the year. {That I may or may not have been hanging on to for a few weeks...}


My drawer for scraps...because the world might end if I throw away a usable piece of paper.


My 8.5x11 papers...


Which sits on top of my 12x12 paper holder...


That is filled to the top...of course.


Why do I have all this paper? Back in the day I was an avid scrapbooker and then I started my journey of making photo blocks with the scrapbook paper. Then I started painting signs and that part of my business took off and the paper was pushed to the side.
 
 If you read my post "Spreading My Wings" I mentioned that I missed working with paper, I really do. Last month, without even giving myself time to talk my self out of it, I signed up for a mail swap that was paper themed. This is exactly what my creativity needed.
 
The person I was matched up with listed fun and bright paper as one of her favorites, as well as flowers. While digging through my stash of paper I found a really fun flower print. Then I found a polka dot paper that coordinated with it and decided instead of just filling her box with paper, why not make a little something that she could hang for inspiration. I found a print that Kristi at I Should Be Mopping the Floor {and my blogging mentor} had posted on her blog and after a quick email to see if it could be resized to a smaller size {Yay, it could!}, she sent me the file which I printed.
 
Now let me tell you, I am one lucky girl. One, because I have a great friend that is also creative and was willing to help. Two, because I had decided on papers to use with a print forgetting that sometimes what you print from your computer does not match the colors you see on the screen...this time, they matched perfectly! Phew!
 
 
Do you love?! I had grabbed some sparkly Duck Tape earlier in the day, I thought it would be fun to use to go along with the shine part. I haven't sat down and crafted with just paper like this {outside of school projects with my girls} for a few years now and I forgot how much fun it is to just sit and put papers together. To brainstorm about what to use them for.
 
 
Like I had hoped, this mail swap, and other new creative things I have been trying has begun to open me up a little more each day to get my creativity going again. If you would like to print out an 8x10 Rise & Shine print from Kristi, you can click here. Like I mentioned earlier, she has quite a few printables and I'm sure you'll find something!


Spreading My Wings

I have been working my way through the Building a Creatively Built Business 2.0 courses in my free time. It is a series of videos made by Jeanne Oliver, Jennifer Rizzo and Miss Mustard Seed {aka Marian Parsons} and the information these ladies have to offer is incredible. Really. Like make you break down in tears incredible because you realize that you are not the only one that has ever faced whatever growing pains you may be going through at that point.

You can click here to go directly to the website to find out more about this class as well as all the other wonderful classes Jeanne Oliver offer {I have my eye on a few other ones at the moment!}.

I just finished the chapter about diversifying your business and that is one that struck a chord with me. I have always felt that because my signs sell so well, I should just stick with making and selling signs. But the creative person inside of me isn't happy. There are so many other things that I would like to try, so many other things that I enjoy making, so many other items other than paint and wood that I enjoy working with. And at times...well...I've thought that I would be perfectly fine with never having to paint another sign. And that, my friends, has lead to quite a few periods of being burned out and even more periods of not being able to create new designs because my creative side feels trapped.

 In the videos the ladies talk about how branching out, creatively, has helped them fall back in love with what they originally started making. Yes, it was another one of those tears streaming down the face moments.

So I've decided, I'm going to do more of these.


I've always enjoyed making wreaths and they actually help me decompress and relax when making them. {I'm weird, I know, I've accepted it!}

I'm going to play with paper more.


I have always wanted to try making cute tea towels. I've been working on a line of vinyl wording to go on your front door.


I may even get a little crazy and try sewing some things...maybe...like really easy things.

But don't worry, I'm not quitting the sign business. The funny thing is that just working on some other things has sparked my creativity again and for the first time I sat down and started designing again. So be on the lookout for some new signs coming as well as lots of new stuff! And maybe even some pictures of some flops, I have lots of those from time to time!

The Ugly Truth

You guys...this post...it really pains me to show you this. But something has to be done and I think putting it out there in blog land will help me to get motivated to get it done sooner. Plus, I don't ever want any single person for a single second to feel like we are living in a home that is rainbows and unicorns and everything is perfect. We are an ordinary family that makes messes and has our lazy moments.

This is the ugly truth, my Monica's closet...


Yes...I use our dining table to work and create. I have an office that we re-did for this very purpose. Do I use it for that? Simple answer, no. Long answer, I spent too long making sure it looked pretty that I never made sure that it would function for what I needed it for. This mess gets pushed to the side every time we eat dinner. I have been known to be racing around trying to move everything and add a final coat of paint to boards and get dinner on the table that sometimes dinner time straight up stresses me out. I should probably add that I am a messy crafter. I work like crazy not thinking about the mess and then take one day off and spend it cleaning, just to start the cycle again.

And you would never know it, but under that mess is a beautiful table my husband built. A table that I look at Pinterest and just know would look just as beautiful as some of the tables I have pinned with their beautiful center pieces, burlap runners and gorgeous place settings.

The good news, I do have a plan. Shortly after my husband made our table he also built a desk for the kitchen so that we could use the computer we had as a family computer.


The hutch on top is from our tv stand that was once my parent's bedroom furniture. I'm not sure what I am going to do with the hutch part yet but the desk is a perfect work area for me. This piece will be replaced by this...


The kitchen hutch that my in-laws were getting rid of and I just knew that it would be beautiful in my office. This is one of the pieces that is not functional for me. The storage underneath? Full of scrapbooking supplies that I don't need. This piece will give me the extra storage I need in the kitchen and can house the computer for the kids. And I've always wanted an old hutch in the kitchen, so this girl is getting painted white with distressing and the glass is getting replaced with some chicken wire. You know, the faux vintage effect that fits so many of our budgets so well!

The desk will move in to this spot and I plan on adding some open shelving above to store signs as they are drying, that way I can still work on more than one order at a time and not take over the entire house.

So stay tuned, hopefully everything will be moving soon!

Fixer Upper and Chapel Rd.

If you follow any blogs about home décor, chances are you have heard at least one of them talking about HGTV's new show, Fixer Upper. I decided to see what the fuss is about and I am hooked. I spent a whole day, while working, watching any episodes that were On Demand with Time Warner. The best part? The show is filmed in Waco, Texas which is an hour north of where I live. (My friend Kristi from I Should Be Mopping The Floor and I may or may not be planning on how to stalk meet Chip and JoJo.)

Why is this the best part? Because so many shows that I fall in love with for inspiration, for my own house, always seem to be on the other side of the country. I have come to believe that the New England/East Coast area and the Oregon/Washington area have the most fabulous areas to junk in and that it is hopeless to decorate my home the way I want, within the budget I have. To see a show that is filmed an hour away with the style I would love to have in my own home, that gets the creative wheels spinning.

And did they start spinning.

A while back I bought an old street sign that caught my attention.


It wasn't as old as I would have liked it, so I took a sander to it, roughed it up and then lost all inspiration and it sat in a closet.

After my Fixer Upper marathon I decided to pull it out and dig through my scrap pile. After I found the perfect piece I decided to give this stain color a second chance.


I want to love this shade, I really do, but it has too much red in it for my liking. I let it dry a bit and then started sanding it down some.


One of my favorite things to do with stain is to layer it to either get a custom color or make it look like an older piece that has been handed down. Before the first coat dried completely, I added a coat of a new shade called Weathered Oak, hoping that it would make it look like I had found the wood out in a field.


Nope. I think every bit I put on rubbed right off after letting it sit for 5 minutes. I knew I had to break out Old Faithful...


Dark Walnut. I don't know how many shades I have tried and I always go back to Dark Walnut.


Now I have the shade I want and layering it over the Gunstock gives it some of the depth I was looking for. I even used the stain left over on the rag on the street sign to give it an older feel.


My original plan was to screw the sign directly to the wood, but when I laid it down on the wood I decided I didn't want to lose the rippled shape it had developed over time. I dug through my husband's collection of hardware (I hoard wood, he hoards screws and building hardware...it's a match made in heaven) and found these black plastic pieces that were the perfect height for how high I wanted the sign to sit off of the wood.


Now if the sign was made out of wood I would have used regular screws. Since the sign is metal I had two options, drill a hole for the screw or use these...


Self drilling, or self tapping, metal screws. The funny tip on the end basically drills a hole as you are screwing it in. They are made especially for when you are working with metal and are a lifesaver, especially if you don't have a set of metal drill bits on hand (or you can't remember which set of your husband's is for metal.)

I first drilled the screws in to each end of the sign and then placed the black riser under each screw and attached it to the wood backing.


It's hanging right by our French doors that will at sometime lead out to a covered patio and deck. My plan is to make a collection of signs, as well as some unusual antique finds, to hang on the wall. I'm also working on a fun coffee bar/patio drink server idea to put underneath!

How to Install a New Light

I think in my past life I was an electrician. Seriously. I don't remember learning from my dad how to work with wiring things, it just feels like I've always done it and enjoyed doing it. It no longer surprises my husband to come home and find a new light or ceiling fan up when I find one for a great deal!

So today I am sharing...


We have been in the process of painting and updating the outside of our home and in this tutorial I am replacing the light on our back porch. The good thing is that whether you are replacing a light outside or inside, on the wall or the ceiling, it's the same steps.
 
These are the tools that you will need for replacing a light.


The new light, the hardware that came with the light and a drill {or screwdriver}. Photo bombing chocolate lab not required.


My project also required our brad nailer and the air compressor. My parents built the house in 1993 and at that time, the home builder didn't take in to consideration that, at some point, future homeowners might want to upgrade certain parts of the house, like the lighting.


The space that the old light was in was too small for the new light I bought. Luckily it's an easy fix. But first, make sure the breaker that controls the light you are working on is turned off. I usually have one of my daughters watch the light while the other stands halfway between us to tell me when the other yells that the light is off. Now you can remove the old light and the bracket that is attached to the wall.


My husband had already removed our old light when we were painting the house and he just capped the wires off until we could get a new light up.
 
The bracket should be attached to a box (usually blue) that the wires are coming out of. Challenge #2 with our house, I'm pretty sure the back porch light was an after thought. No box, just a hole in the wall with wires coming out. Thank goodness Challenge #1 will take care of #2!


My ever growing scrap pile was the answer to my problems. I cut two pieces of the trim we used for the French doors to fit in the space between the window trim and the door trim and nailed them in using the brad nailer. I made sure to check which way the wire was coming through the hole before nailing.


Now is the point where you would line up the holes in your bracket to the holes of the electrical box and screw them in. Since there is no box on this light, I took the wood screws that were used on the bracket from the old light and used them to screw the new bracket to the wood I just nailed up to fill the gap between the wall and the light base.


As I was climbing down the step ladder at this point I realized I had a captive audience that couldn't wait to get back outside. (Please pardon the nose prints! My new project is finding a way to keep them from scratching up the freshly painted doors.)


Next up for the light is hooking up the wires! I promise it is easy. When connecting the wires always remember: White always goes to white, black always goes to black and the bare copper wire coming from the light is always the ground wire that will attach to the green wire coming from the wall and/or the green screw on the bracket. Twist the matching wires together clockwise (you may need to trim the wire if too long or remove some of the plastic coating on the wires) and then take the wire nut (plastic cap item) and insert the wires into it and twist clockwise until tight.


Now push the wires back in to the electrical box and put the mounting screw(s) through the holes on the light and use the provided cap to tighten. Before you tighten it down completely take a second and make sure that it looks level and straight. If it does, tighten that baby down and give yourself a pat on the back!!

Go back and flip the breaker back on and go test out your new light. Stand back and say a few choice words in frustration when your light doesn't work...because you turned on the wrong light switch!

Wasn't that easy?! Now there is nothing stopping you from getting rid of those tired, outdated lights you avoid looking at.


In case you were wondering, this is the brand and stock number of the light I used from Lowe's. There are two sizes, I went with the smaller version that was $29.88 (?). It will go with the new cedar patio cover we are putting up that will have a galvanized roof (squeal!!). I will definitely be taking photos of that project to share with you!


If I missed a step or if you have a question, leave me  comment and I will get right back to you!